Flower shaping tools, part 4: knife tools

For 2019 I have planned a series of short videos demonstrating how to works with different types of flower tools.
I believe this will help you understand your tools better and use them to their full potential achieving great shapes and lines on your petals and leaves.

This is the forth video in the series, for which I have chosen another popular tool that can probably be found in any set, traditional or more modern: a knife tool, the sharpest tool in the flower making set.

flower shaping tools
To be more precise I am demonstrating how to work with both, the single blade knife tool and the double knife tool that has got a groove.
Both of these tools can be used for shaping a wide variety of leaves as well as flower petals. I regularly use the knife tool to shape fabric butterfly wings, too.  In other words, anywhere where you could do with some veining or lines to add texture, shape and interest, you can use your knife tools on fabric as well as leather.

Normally knife type tools are used with medium pads  as shown in the video.

In skillful hands a simple knife tool can produce a range of different effects, some of which I am showing in today’s video, where I am shaping a flannelette poppy leaf, a velveteen lily petal and a golden lame satin butterfly wing, all of which are made with different fabrics.
The more different flowers you learn to make, the better you become at using your knife tools. I think I would  probably not be wrong if I say that the knife tool features in most of our tutorials, which shows how indispensable it really is for a flower maker.
Currently the single blade and double blade knife tools can be purchased as part of the 14 pc European set of tools or the more extensive 22 pc set of tools (use the links at the end of the email to find out more about each set).
In case if you believe you could benefit from a hands-on one-to-one workshop to improve your flower shaping and flower making skills you are welcome to book one of our workshops (see the schedule here).
Meanwhile watch the video I have prepared for you today (see the link below) where I am demonstrating several ways of using these well-known tools and (hopefully) discover something new for yourself.
Leather Pompom Rose tutorial

Flower shaping tools, part 3: ball tools

For 2019 I have planned a series of short videos demonstrating how to works with different types of flower tools.
I believe this will help you understand your tools better and use them to their full potential achieving great shapes and lines on your petals and leaves.

This is the third video in the series, for which I have chosen a very familiar flower shaping tool, or, in fact tools: ball tools.

I wouldn’t be far off, if I said that a round or a ball tool was one of the first tools invented for shaping flowers. Lots of petals have a concave shape, so a tool like that was really necessary in flower making.flower shaping ball tools
As a rule each set has several balls of different diameter ranging from 2mm to 30mm.
If you wish, you could find ball tools even larger than 30 mm for shaping oversized flowers.

Ball tools are widely used for shaping rose petals and work well with both soft and medium pads.

In skillful hands a simple ball tool can produce incredible and very different results.
Some of which I am showing in the video below, where I am shaping 4 rose petals in 4 different ways to achieve different effect and therefore a differently shaped flower.
The more different roses (as well as other flowers) you learn to make, the better you become at using your ball tools.
In my Advanced Silk Rose video course (book now to take part in September 2019) we’cover conventional and less so ordinary use of the ball tools when shaping our roses. So if this subject is of interest to you, you have some experience in flower making and would like to improve your skills you are welcome to join the course here.
Meanwhile watch the video I have prepared for you today (see the link below) where I am demonstrating less so ordinary ways of using these familiar tools and (hopefully) discover something new for yourself
.
flower shaping millinery tools

More on flower shaping millinery tools

Flower shaping or otherwise known as millinery tools… We use millinery tools to shape fabric in order to create realistic or artistic petals and leaves which we then assemble into flower pieces. They are essential for the craft (and ART) and yet they cause more questions than any other aspect of flower making.

In our previous articles we have discussed how one could shape petals and leaves without the use of tools ( Shaping fabric flower petals without the use of tools ). Yes it is possible, but really rather limiting. Owning a set of tools gives you many more possibilities when it comes to flower making, in particular if you are interested in our yearly SUBSCRIPTION programme (learn more and register your interest for 2018 here). To make the most of the tutorial Subscription one must have a set of flower shaping tools.

Today I will try and answer 5 hottest questions about flower shaping tools that I hear most often.
❀ 1 ❀ Which is a better set: the one on separate handles or the one that comes with an electric iron?
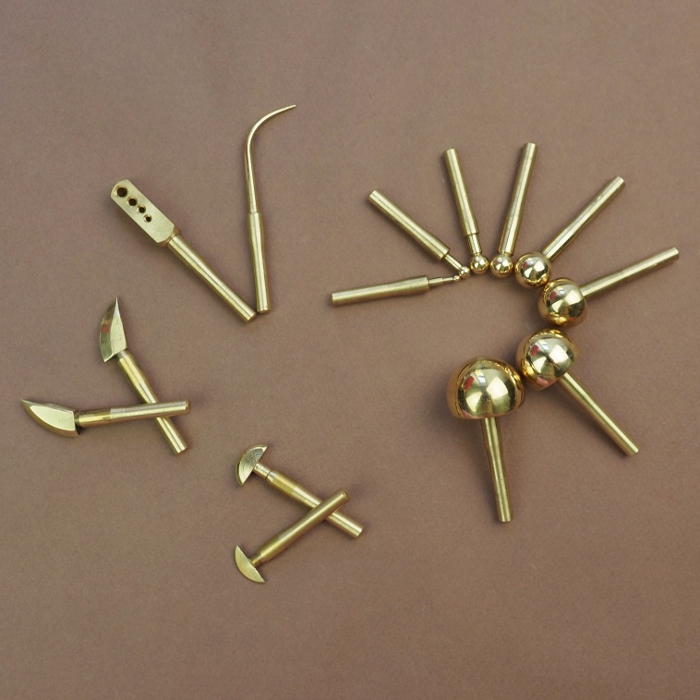
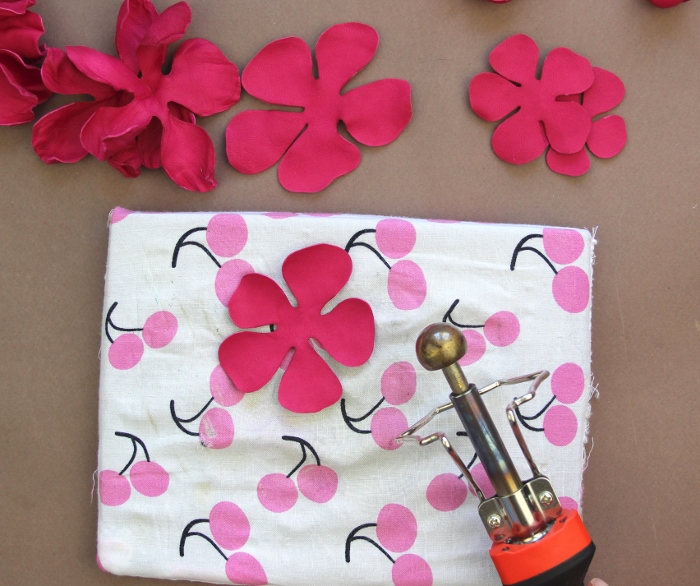
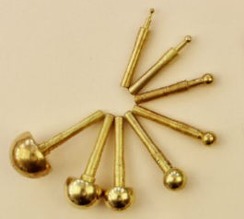
This could possibly be down to personal preferences but I believe that the electric iron set allows to work quicker. It is advisable to have 2 or 3 flower irons so that when shaping a flower you could have 2-3 tools, that are required for shaping it, heated at the same time. Sets on separate handles come from the times when there was no electricity, why not use the achievements of the civilization to our advantage? If you have inherited a set of tools on separate handles or you have already got one of those, you can of course continue using it. For those of you who are thinking about purchasing a new set I would recommend to go for an electric flower iron with a set of interchangeable tips (see the photo of the tips above).
❀ 2 ❀ Do I have to have a whole set? How many tools will I really need?

millinery tools

There are a lot of different flower shaping tools. Some are used very often and are a part of any basic set, others are more rare and specialist. So how many of them will
one flower maker need?
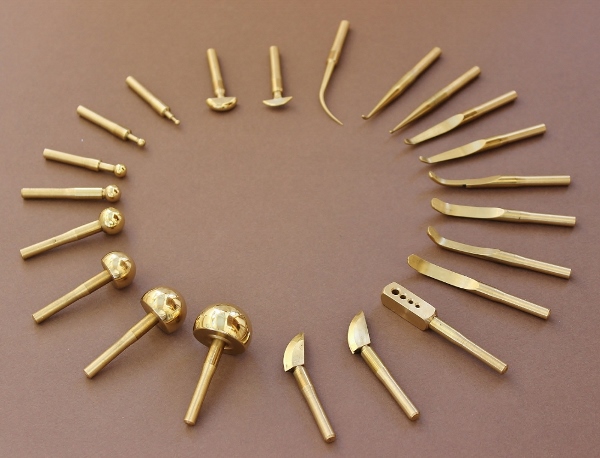
Each tool has been designed for a particular purpose whether it scoring a line, creating a concave or curling up fabric. Some tools are interchangeable and differ only by the design, but are really meant to do the same job. I would say if you are thinking about making flowers seriously, it is good to have a starter or basic set which consists of a number of round tips of different diameters from about 3 mm to 30 mm, two knives to score lines, two chrysanthemum tools to create softer lines, a tube making attachment and a hook. Later you can add  such tools as lily-of-the-valley attachment or forget-me-not tool, or 35mm and 40mm round tools as optional extras.
The main thing to understand is that the more tools you have the more options there are at your disposal to shape fabric. Start with a basic one and build up your set by adding other invaluable tips to it ad you go along. In love with flower making? Then do not hesitate, get the whole lot straightaway and start creating.
If you own a set of tools but you believe you could do with some additional tools, consider our special offer on 
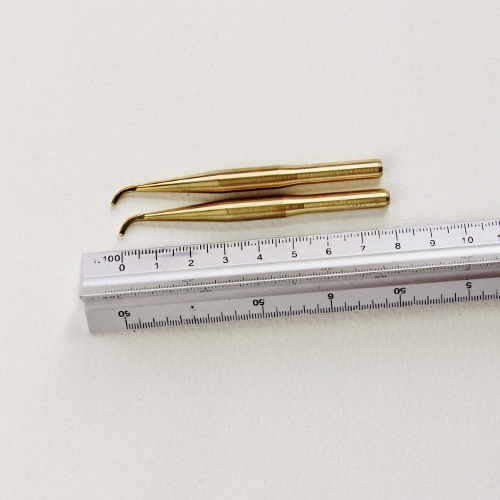
2 extra narrow millinery tools which are indispensable for shaping leaves as well as petals. They are used in most of our tutorials.
❀ 3 ❀ What metal should the tools be made of?
Some tools are made of brass, hence the yellow-golden colour. This metal heats up well and does not rust which makes it a good choice for flower shaping tips. On the other hand, steel tools are available for sale as well.  Steel takes a bit longer to heat up but otherwise is an excellent choice too. Some Japanese tools are made of brass, mainly round tips (because it heats quicker), and others are made of steel (knives, chrysanthemum tools etc), there are some that are even made of a combination of both (a forget-me-not tip).In any case let not the metal stop you when choosing millinery tools, you should be alright using a set made of either brass or steel.
❀ 4 ❀ Where to buy a good set of flower shaping millinery tools?
Suppose you have not got any, where do you go to get one?
Flower shaping tool set is a highly specialised item that can not be picked up at your local craft shop and only sold by very few. The easiest way is of course to buy online and have the set shipped to where you live. Places to check out is ebay and Etsy. You can also pick up some antique flower making tools at your local antiques shop or again online. Another option is to buy a set of tools of your flower teacher.At the moment you can place an order for a flower shaping tool sets here. These are the exact same sets I have used myself for the last 6 years for making flowers, teaching and filming my tutorials.
❀ 5 ❀ Why are millinery tools so expensive? Can I find them anywhere cheap?
Are the millinery tools expensive? I guess they are. And they are not. No more than hat blocks or other tools that we use for creating our handmade masterpieces. Regard the purchase of a set of flower shaping tools as an investment in yourself and in your ability to create countless gorgeous flowers with their help. I would steer clear of very cheap sets as the quality might not be there and you will end up throwing money to the wind. Better start with a smaller good quality reliable set and then just add more tools to it as you go along.
flower making tools full set

I am pleased to offer  the exact same full 22 piece set of flower shaping tools that I use for making all of my designs, film my tutorials and teach,

These sets of flower shaping millinery tools can be ordered HERE.
So if you are considering subscribing to our monthly flower making tutorials in 2018 make sure you have all the necessary tools to work with during the learning process.
how to make a fabric poppy

New tutorial out! Ever so popular fabric poppy – let’s get creative this autumn

Would like to learn how to make a fabric poppy? Read on 🙂

I have been meaning to do that for quite some time and finally today I am happy to share with you my latest tutorial!

With Remembrance Day just round the corner the timing seems just right. But red poppy flower is not only for Poppy day. This stylish accessory is ideal for complementing an outfit or making a unique gift for your loved ones.

Honestly I do not know anybody who would not like poppies. But the real flower seems to be so short-lived that there is no other option left really

fabric poppy corsage kit pattern but to capture its beauty and preserve it in fabric. And this is when my tutorial comes in handy. It is suitable for beginners as well as more advanced artists.

Although more complex designs requires special millinery tools, the design I have for you today requires no special tools or expensive fabrics but still allows you to create a fantastic handmade accessory.

With more than 60 pictures explaining in detail the whole process of creating your own designer accessory, this 49 page .pdf ebook (no hard copy is available) will teach you how to create a bright fabric poppy to be used in accessories, as wedding decorations, in millinery and much more. I have included the pattern too.

To find out what tools and materials are needed the tutorial please head to my Tutorials e-store

In case if you have got millinery tools and would like to try a more advanced version of this popular flower, check out this recording of the live online video demonstration on WILD VELVET POPPIES. A combination of soft velvet and luxurious golden metallic backing fabric create a beautifully sculptured velvet poppy flower perfect for a special occasion as well as for everyday wear.

To learn more about this poppy and how to make it visit the live online video demonstration on WILD VELVET POPPIES.

How to make a fabric poppy? Now you know too 🙂


If you’d like me to comment on your creations and give advice what needs improvement, please share your poppies in the comments to this post and I’ll be more than happy to give you my feedback free of charge.leather poppy flower tutorial

You might be also interested in LEATHER POPPY TUTORIAL
lace butterfly headband

New tutorial out! Lace butterfly: a stunning accessory you can make yourself without special tools.

I think I have not met anyone who did not like butterflies. They are fascinating and delicate creatures full of beauty. No wonder we want to capture it and embody in our designs to enjoy their perfection and elegance as and when we want it.
I love creating butterflies made of delicate lace and pure silk. Such designs look appropriate in wedding themes, they are perfect for special occasions, as little girls’ hair accessories, etc. They make a nice gift too.
I have developed this tutorial in a way that you can make your own stunning lace butterfly accessory without having to use any specialised tools.
By varying the size of the butterfly and uBysing coloured laces you can create an accessory to match any outfit. This lace butterfly can be attached to a headband, a hair clip, a brooch base or just sewn onto a garment, such as a wedding dress.  It can be used in millinery too to decorate hats and fasciantors. The applications are endless. Once you have mastered the art of making lace butterflies you can easily create different accessories in sizes and colours that are required.
You will learn how to
  • make beautifully light feather antennae
  • create a stunning body of seed beads
  • wire the wings so they hold their shape
  • attach the butterfly to a headband / hair clip
butterfly 49 new

WAIT! THAT’S NOT ALL


For those of you who have a set of millinery tools I have prepared a FREE bonus tutorial. The free tutorial explains how to shape the velvet butterfly wings using a set of millinery tools for silk flower making as shown in the picture below. For this butterfly I have used a different template which I have included as well! 
To be able to receive the bonus tutorial you will need to subscribe to my mailing list using the link in the Lace Butterfly Tutorial. 
At the moment the lace butterfly tutorial is available for instant download now from my tutorial shop here.
lace butterfly tutorial
Should you have any questions regarding materials or tools prior to purchasing the tutorial please feel free to contact me either via this blog (comments) or at enquiries@presentperfectcreations.com